Summary
When an agent would like to do a bulk upload of their contact/property database to the CRM, they will need to contact the Onboarding Team (OSM) to begin the process.
The agent prepares their data using the Contact Import CSV template and submits it through the Data Import form below. The Onboarding Team will ensure the template has been correctly formatted and will then complete the bulk import into the CRM.
Step 1 — Get the Contact Import Template
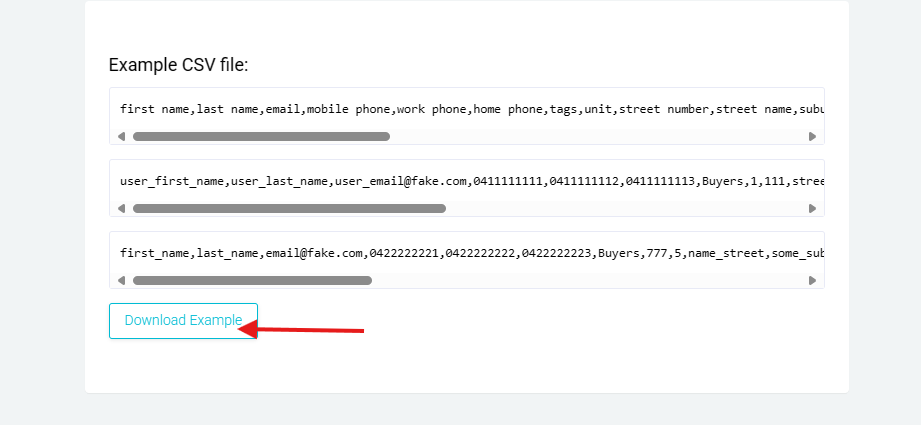
The OSM will send the agent the Contact Import Template (a .CSV file). An example of the file format is shown below — the example file is also attached to this article.
CSV Template Columns
The Contact Import CSV template includes a set of supported column headers. The file must use these exact column names in the header row for the import to map data correctly. Column headers use lowercase with spaces (e.g. "first name", "last name").
Two new columns have been added to the template:
- legal name — maps to the Legal Name field on the contact record. If left blank, the field will remain empty on the imported contact.
- greeting name — maps to the Greeting Name field on the contact record. If left blank, the field will remain empty on the imported contact.
These columns are in addition to the existing columns covering first name, last name, email, phone numbers, tags, address fields, and property attributes. All existing columns remain unchanged and continue to import as before.
Note: if the legal name or greeting name cells are left blank, the import will proceed without error and the corresponding fields will simply remain blank on the contact record.
Step 2 — Prepare the Data
Only .CSV file types can be imported, and the file needs to be formatted correctly:
- Keep the file saved as a .CSV (not .XLSX or another spreadsheet format).
- Make sure the column headers exactly match the template (lowercase with spaces).
- Populate the legal name and greeting name columns where the information is available.
- Check the data is clean — consistent phone number and email formats, no stray characters or merged cells.
Step 3 — Submit the Data Import Form
Once the template is completed, submit it using the Data Import form:
https://form.jotform.com/241931139481053
What Happens Next
Submitting the form sends the request to the team. The Onboarding Team will check the file formatting and complete the bulk import into the CRM. Any duplicate or skipped contacts are identified during the import, and the agent will be advised once the import has been completed.
Was this article helpful?
That’s Great!
Thank you for your feedback
Sorry! We couldn't be helpful
Thank you for your feedback
Feedback sent
We appreciate your effort and will try to fix the article